4 tips for your Vue.js 3 projects
At Atipik, we love Vue, and it's only natural that we started developing on the latest Vue3 version for our new front-end projects. In this article, we've gathered our tips and tricks that we consider extremely useful for efficient development and maintainable code. Enjoy it, it's a gift 🎁 !

#1 Vue has (already) invented teleportation 💺
Link to the official doc: https://vuejs.org/guide/built-ins/teleport.html#teleport
Any front-end developer has already found himself in a situation where a DOM element is not displayed correctly because of its position in the tree due to a position: relative or a z-index: 9999 of one of its parents.
The most telling example is the modal: let's imagine that we want to display a confirmation modal in an SFC (Single File Component) very low in the tree, like this:
<template>
  <div class="relative w-full h-48 border-2 border-red-500">
    <h1>Hello World</h1>
    <button @click="$refs.confirmationModal.show()">
      Click me!
    </button>
    <Modal ref="confirmationModal">
      <template #header>Confirmed!</template>
      It's all good
    </Modal>
  </div>
</template>

<script>
...
</script>
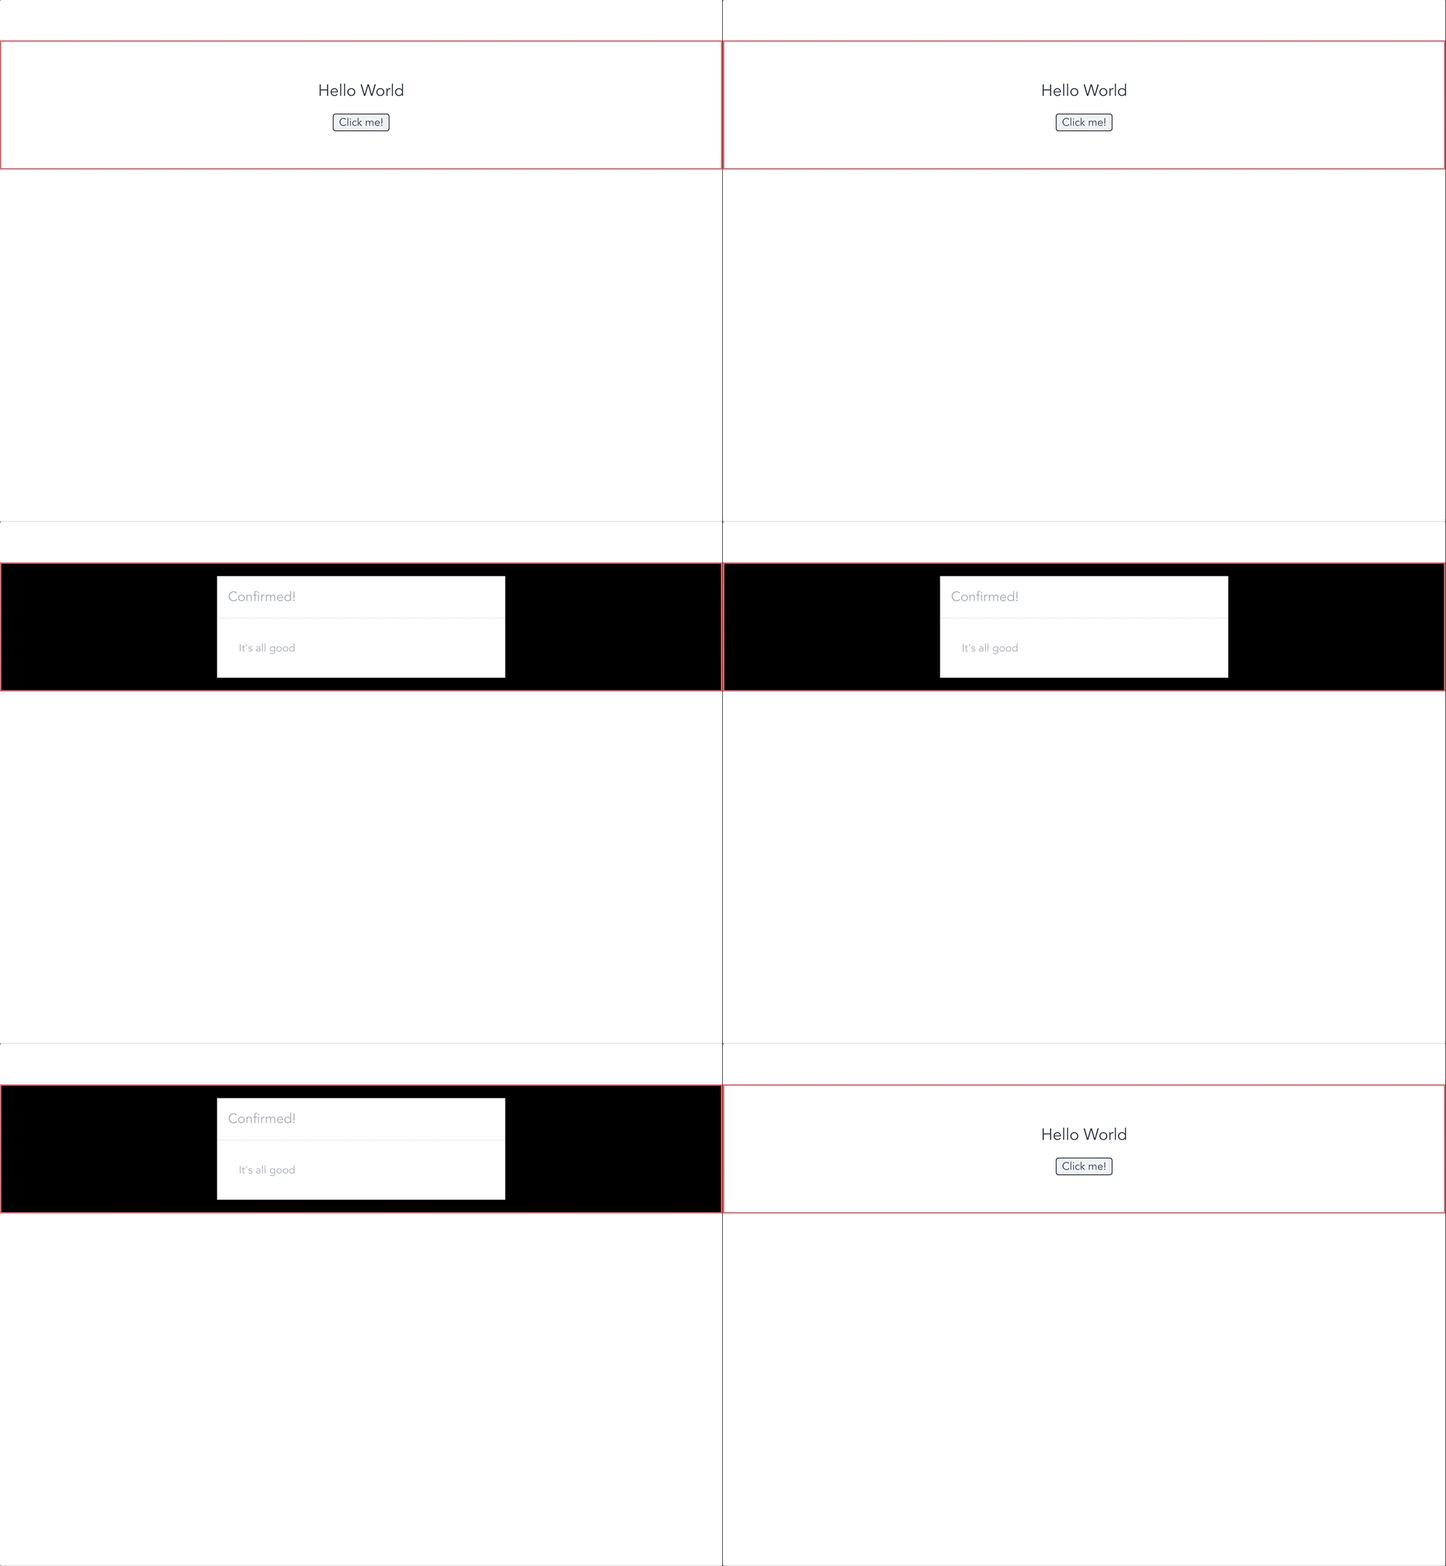
As you can see, the Modal is included in a div with a relative positioning. So, well, this is what it looks like:

The problem is that we'd like to keep this modal in exactly the same place while displaying it in fullscreen.
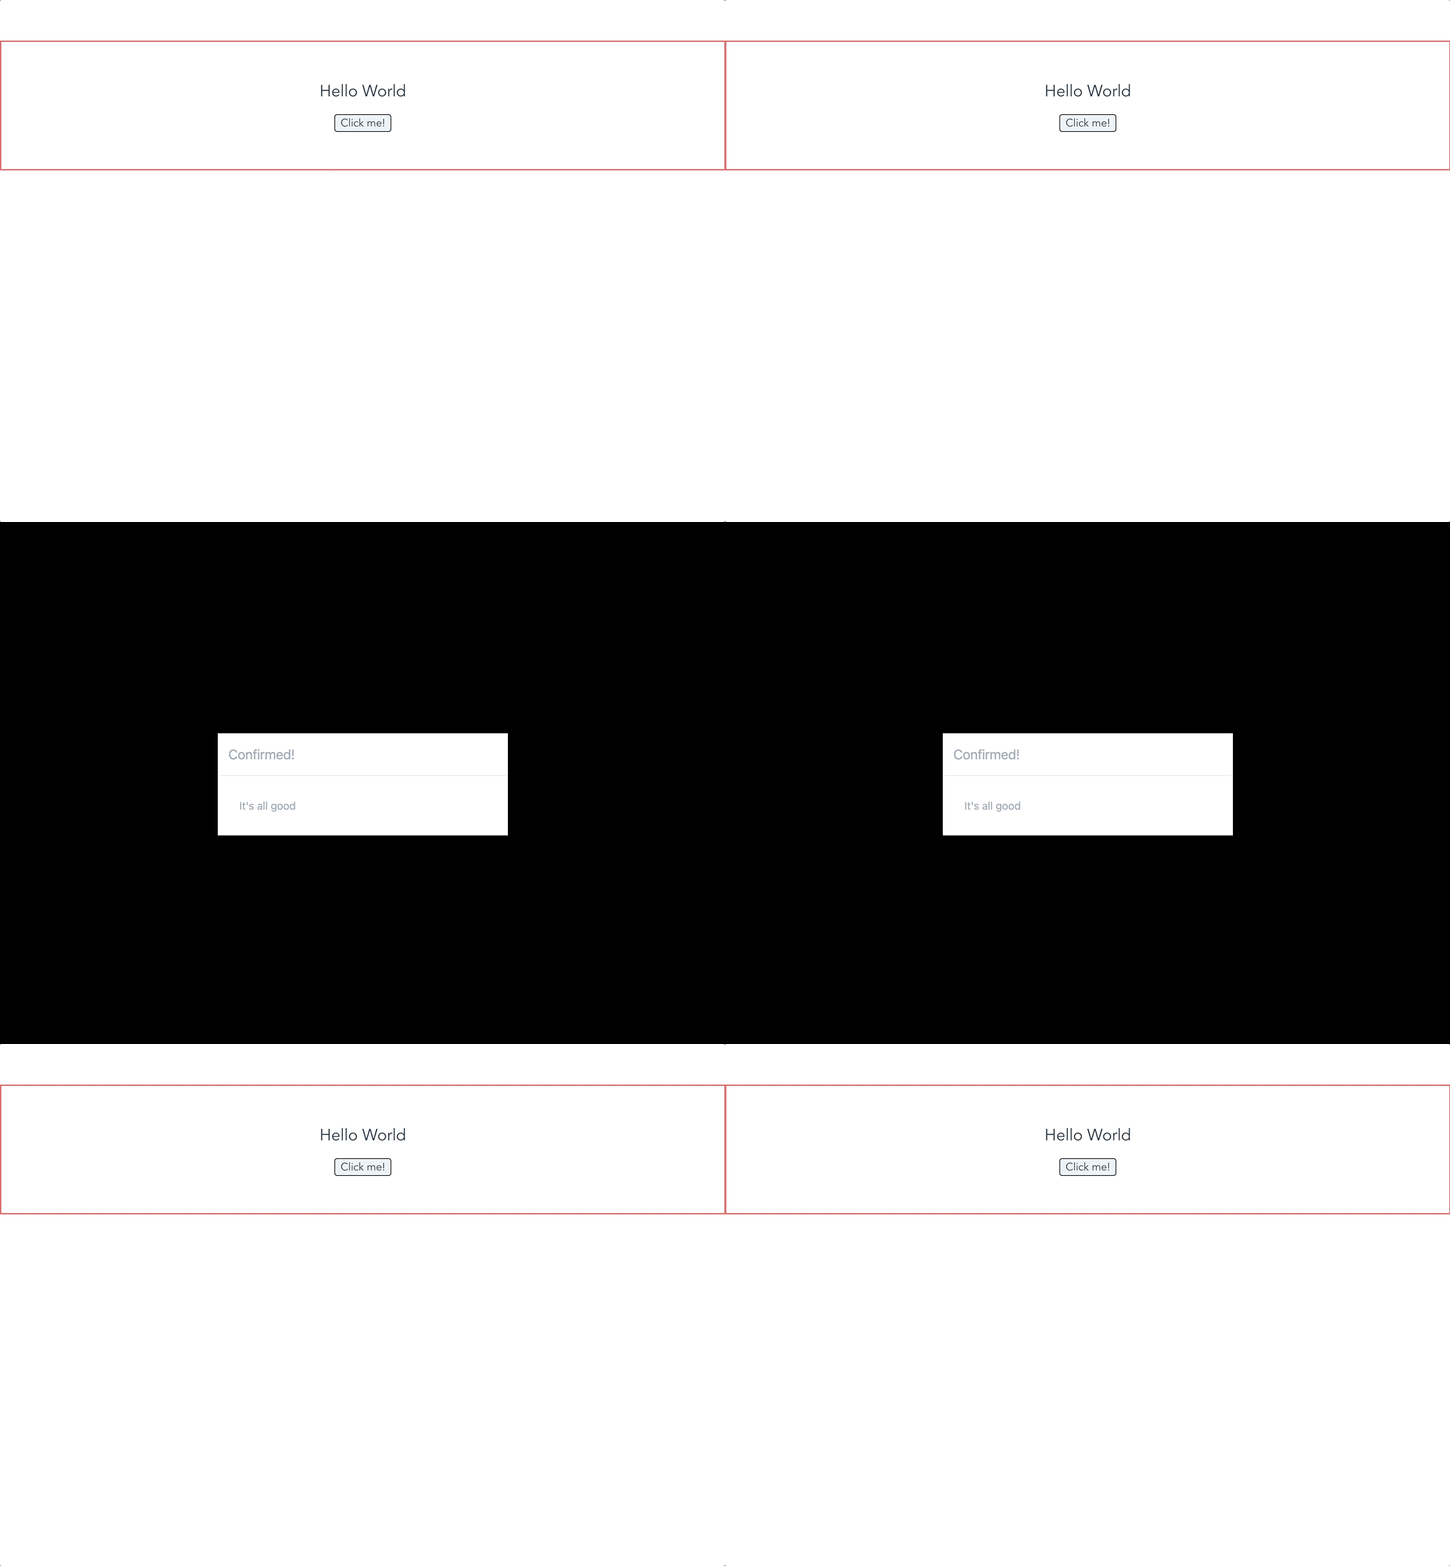
This is where the new Teleport component comes in handy. Just wrap the modal inside and you're done!
For the props, it's very simple, you just have to specify a tag or a CSS selector in the to prop. In our case, "body" seems quite natural.
<template>
  <div>
    ...
    <Teleport to="body">
      <Modal ref="confirmationModal">
        ...
      </Modal>
     </Teleport>
  </div>
</template>

<script>
...
</script>
Obviously, it's best to insert the Teleport in the Modal component directly.
#2 v-model(s) in abundance 🤩
If you don't know what v-model is for, the most telling example is on an input :
<input
  v-model="message"
  placeholder="edit me"
/>
This little piece of code allows to have a binding in both directions:
- The value of the input is filled by message.
- Each time the input value changes, message is updated
The v-model is nothing but a shortcut, which can also be written like this in the case of input :
<input
  :value="message"
  @input="event => message = event.target.value"
>
Using v-model on custom components
And in fact, it is very easy to implement a v-model on a custom component, using the same technique with some adjustments.
Here is an example with a CustomSelect :
<template>
  <label>Please select one</label>
  <div>
    <div
      v-for="(option, index) in options"
      :key="index"
      @click="selectOption(option)"
    >
      {{ option }}
    </div>
  </div>
</template>

<script>
export default {
  props: {
    value: {
      type: String,
      required: true
    }
  },
  data() {
    return {
      options: ["Choice 1", "Choice 2", "Choice 3"]
    };
  },
  methods: {
    selectOption(option) {
      this.$emit("update:modelValue", option);
    }
  }
};
</script>
Two important points to remember about this piece of code:
- We declare a value prop, which is mandatory for the use of a v-model.
- We emit an event update:modelValue with the value of our choice. Be careful, the name of the event is important for the v-model to be correctly updated in the parent.
In Vue2, we can only have one v-model attribute. This is good, but it is a bit limiting, we must admit.
An infinity of v-model with Vue3
With Vue3, we now have the possibility to have an infinity of v-model 🎉
Let's take an example to illustrate the use of 2 v-model on a component. Suppose we need a component that allows us to input a text field and returns the validation status of that field.
First, the parent component :
<template>
  <label>Message</label>
  <CustomInput
    v-model:input="message"
    v-model:valid="isMessageValid"
  />
</template>

<script>
import CustomInput from './form/CustomInput';

export default {
  components: {
    CustomInput
  }
  data() {
    return {
      message: '',
      isMessageValid: true
    };
  }
};
</script>
Let's move on to the implementation of the CustomInput.vue component:
<template>
  <input
    type="text"
    v-model="inputValue"
    @input="setValidity"
  />
</template>

<script>
import { computed } from 'vue';

export default {
  props: {
    input: {
      type: String
    },
    valid: {
      type: Boolean
    },
    validator: {
      type: Function,
      required: true
    },
  },
  setup(props, { emit }) {
    const inputValue = computed({
      get: () => props["input"],
      set: (value) => emit("update:input", value)
    });
    const validValue = computed({
      get: () => props["valid"],
      set: (value) => emit("update:valid", value)
    });
    return {
      inputValue,
      validValue,
    };
  },
  methods: {
    setValidity() {
      this.validValue = this.validator(this.input);
    }
  }
};
</script>
Yes, there's quite a bit going on 😱 here's in detail:
- At the template level, we have our input which allows the user to enter his text
- We use the v-model of the input to bind our prop input
- At each change, we call the setValidity function which updates the validity of the input according to the provided validator
- Props level :
- input: the actual text field that contains the user's input
- valid: a boolean which gives us the validity of the input
- validator: a callback that determines the validity of the input
- We use the setup function of the composition API to build our v-model.
- In the setValidity method, we simply assign the result of the validator to the computed, which will automatically propagate the change to the parent v-model.
#3 The transmission of props, from generation to generation 👴 👨🦰 👶
Link to official doc: https://vuejs.org/guide/components/provide-inject.html
Generally, we use a store (Vuex to name the most popular) to share data to multiple components. It's perfect in 99% of the cases, except that sometimes, we just want to share a data from a parent component to all its children components, without using a store.
.png)
Source: https://vuejs.org/guide/components/provide-inject.html#prop-drilling
In Vue2, we had no choice but to declare the same prop on all descendants so that the grand-grandchild would have access to it. Not really satisfying, is it?
Vue3 introduces a new concept, the provide / inject :
.png)
Source: https://vuejs.org/guide/components/provide-inject.html#prop-drilling
The principle is simple:
- From the parent component, we declare the variables (props, data, computed, ...) which will be accessible to all descendants via the provide key
- From any child component, we specify the list of injectable variables via the inject key
To illustrate with an example, let’s imagine we have a modal that contains a form. The idea is to be able to access the shown data of the modal in all the inputs of the form in order to be able to execute a routine when its value changes to true.
<template>
  <form>
    <Input />
    <Input />
    <Input />
  </form>
</template>

<script>
import { computed } from 'vue';
import Input from './form/Input.vue';

export default {
  components: {
    Input
  },
  provide() {
    return {
      modalShown: computed(() => this.shown)
    };
  },
  data() {
    return {
      shown: false
    };
  },
  methods: {
    show() {
      this.shown = true;
    },
    hide() {
      this.shown = false;
    }
  }
};
</script>
Note that for the value of the provide to be dynamic, it must be wrapped in a computed.
<template>
  <input
    type="text"
    v-model="input"
  />
</template>

<script>
import Input from './form/Input.vue';

export default {
  inject: ['modalShown'],
  props: {
    input {
      type: String
    }
  },
  watch: {
    modalShown(shown) {
      if (shown) {
        // modal shown, do something crazy!
      }
    }
  }
};
</script>
#4 Component inheritance 🏰
Link to the official doc: https://vuejs.org/api/options-composition.html#extends
In some situations, it is interesting to share a piece of code to apply a certain behavior to a set of components or even all components of a Vue app. To do so, we can use mixins.
Here is an example that applies a mixin to all the components of a Vue app:
const mixin = {
  created() {
    console.log(1);
  }
};

createApp({
  mixins: [mixin],
  created() {
    console.log(2);
  }
});
Source: https://vuejs.org/api/options-composition.html#mixins
Here is another example that applies the mixin only to certain components:
// Component1.vue
export default {
  mixins: [MySuperMixin]
};

// Component2.vue
export default {
  mixins: [MySuperMixin]
};

// Component3.vue
export default {};
This feature is very useful in most cases, but it constrains us in terms of implementation:
- Either we apply the mixin to ALL components
- Or we apply the mixin to each component, forcing us to import and specify it in each component
For your information, the use of mixins is now discouraged in Vue3. Instead, it is better to use the Composition API.
In Vue3, the Options API provides us with the extends feature. It looks very similar to the mixins option, but its intent is slightly different: mixins focuses on code reuse, while extends focuses on inheritance.
As the name implies, extends allows us to inherit from another component, while applying the same evaluation rules as mixins.
For example, it allows us to implement a generic component providing a form validation method:
export default {
  computed: {
    isFormValid() {
      return !_.some(this.inputs, input => !input);
    }
  }
};
Then, we can implement form components by inheriting from FormValidator:
export default {
  extends: FormValidator,
  methods: {
    postForm() {
      if (!this.isFormValid) {
        return;
      }

      // ...
    }
  }
};
These few tips should be useful for the development of your Vue3 apps, at least we hope so! This list is far from being exhaustive. You can find the major new features here.


